If you've lost your mailbox key, the fastest legitimate solution is to replace the lock yourself — a standard residential cam lock costs $8-15 and installs in under 5 minutes with a screwdriver. Calling a locksmith or contacting USPS are the right options if the lock is part of a cluster mailbox unit you don't own.
Here are the 4 legitimate methods ranked by speed and cost, what to avoid, and how to prevent future lockouts.
The Legal Boundaries — What You Can and Can't Do
This matters before anything else. Federal law (Title 18, U.S. Code § 1705) makes it a federal offense to damage, destroy, or tamper with a mailbox. This applies to your own mailbox — the law protects the mail inside, not just the physical box.
What this means practically : forcing a lock, drilling it out without authorization, or using improvised tools that damage the mechanism can technically constitute a federal violation, and at minimum creates USPS compliance issues that can result in mail service suspension.
What is fully legal : replacing your own residential mailbox lock, contacting USPS for assistance with a lock they manage, hiring a licensed locksmith, or using a spare key. These are the only approaches worth considering.
⚠️ Important distinction : residential vs cluster mailboxes If your mailbox is an individual curbside or wall-mounted box that you own — you have full authority to replace the lock. If your mailbox is part of a cluster box unit (CBU) in an apartment complex, HOA community, or multi-unit building — USPS or your property manager controls the lock. Do not attempt to open or replace a CBU lock yourself. Contact the post office or property manager directly.
Method 1 — Replace the Lock Yourself (Fastest for Residential Mailboxes)
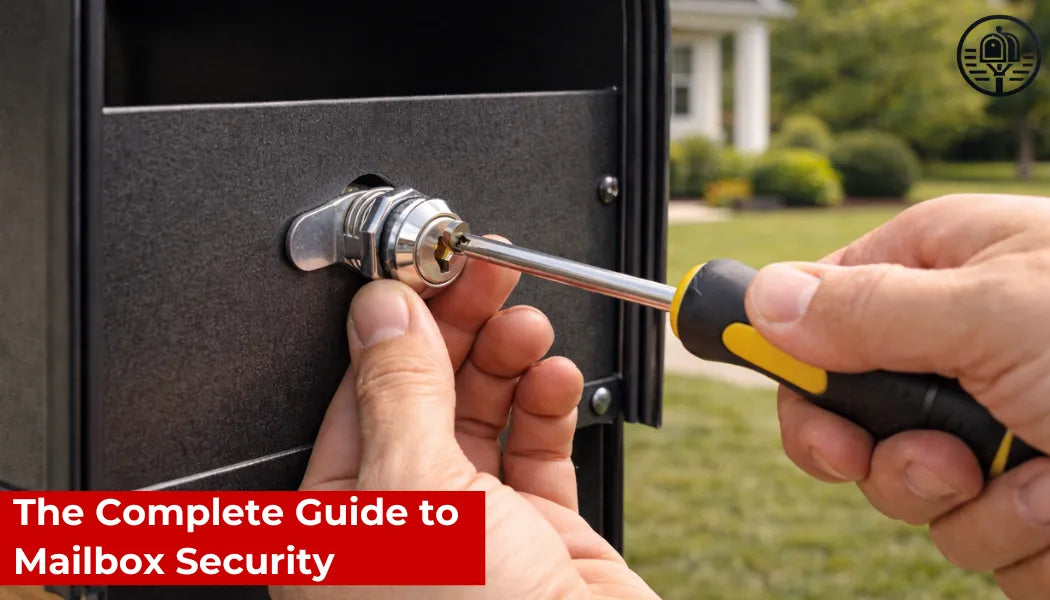
For standard residential curbside mailboxes, replacing the lock is faster, cheaper, and more permanent than any other solution. You don't need locksmith skills — it's a 5-minute process with a flathead screwdriver.
What you need : A replacement cam lock compatible with your mailbox — standard residential mailboxes use a 5/8" (16mm) cam lock. Measure your existing lock hole diameter before ordering to confirm. Cost : $8-20 at any hardware store or online.
The process : Open the mailbox door fully. Inside the mailbox, locate the retaining nut on the back of the lock cylinder — it's a hex or flathead nut threaded onto the barrel. Unscrew it counterclockwise and remove it along with the cam arm (the flat metal piece that rotates to lock the door). Pull the old cylinder out from the front. Insert the new cylinder from the front, thread on the retaining nut from inside, and attach the cam arm. Test by locking and unlocking several times. Done.
The entire process takes under 5 minutes and leaves the mailbox fully functional with a new set of keys. This is the correct solution for most residential lockout situations.
🔑 Need a replacement lock? Our mailbox lock collection includes standard cam locks and pin tumbler upgrades compatible with most residential curbside and wall-mounted mailboxes. Each listing includes hole diameter and panel thickness specs — filter by your mailbox dimensions for an exact fit. Free shipping on all orders.
Method 2 — Contact Your Local Post Office
If your mailbox is a USPS-managed cluster box unit, your local post office is the correct first call. USPS has master keys for the CBU units on their routes and can open your individual compartment for you. They can also initiate a lock replacement if your key is permanently lost — the process varies by location but typically takes 1-5 business days.
For individual residential mailboxes, USPS doesn't typically manage the lock — but your local branch may be able to advise on the correct replacement lock format and can hold your mail while you arrange access.
How to reach your local branch : Go to usps.com/locator, enter your zip code, and call the branch directly. Explain you've lost your mailbox key and need assistance. Don't use the general USPS customer service line — branch-level staff handle mailbox access issues directly.
Method 3 — Hire a Licensed Locksmith
A licensed locksmith can open most residential mailbox cam locks non-destructively in under 10 minutes using pick tools. They can also rekey an existing lock if the cylinder is in good condition — this is cheaper than full replacement and gives you new keys without buying a new lock.
Cost : $50-100 for a service call including the lock opening. Rekeying typically adds $15-30. Full replacement by a locksmith runs $60-120 depending on the lock model and labor rate.
Locksmith service makes the most sense when the lock is stuck or damaged rather than just keyless — when the lock mechanism itself is the problem rather than simply a lost key. For a standard lost-key situation on a residential mailbox, DIY replacement is faster and significantly cheaper.
How to find a reputable locksmith : Search for licensed locksmiths in your area through ALOA (Associated Locksmiths of America) at aloa.org — their member directory lists verified professionals by zip code.
Method 4 — Use USPS Form 1094 for PO Box Keys
If you're locked out of a USPS Post Office Box rather than a residential mailbox, the process is different. USPS Form 1094 (Application for Keys or Locks) is the official request for a duplicate PO Box key or lock replacement. Submit it at your local post office in person with a valid photo ID.
Standard key replacement fee is $11.05 per key as of 2026. Lock replacement (if keys are completely lost) runs $21.10. Processing time is typically 3-5 business days.
This applies only to USPS PO Boxes — not to residential curbside or wall-mounted mailboxes.
What Not to Do
Bobby pins and improvised picks — tutorials exist showing how to pick cam locks with bobby pins. Cam locks are relatively simple mechanisms and some can be manipulated this way. The problem : doing this on your own mailbox is technically legal, but the technique frequently damages the pin stack, making the lock harder to open even with the correct key afterward. It also takes significantly longer than just replacing the lock for $10.
Drilling the lock — destructive entry that permanently damages the mailbox door and requires replacement of both the lock and potentially the door. Never the right approach on a $10 cam lock.
Forcing the door — bending the door frame to bypass the cam arm compromises the mailbox's structural integrity and USPS compliance. A bent door that doesn't seal properly is grounds for mail delivery suspension.
Contacting a locksmith for a cluster box — locksmiths cannot legally open USPS-managed cluster box units. Only USPS personnel have legal authority to access CBU master locks.
📬 The 10-minute permanent solution Lost key on a residential mailbox → buy a $10 cam lock → replace in 5 minutes → done permanently. This is faster than waiting for a locksmith, cheaper than a service call, and more reliable than any improvised method. Our mailbox locks ship free with next-day processing.
Preventing Future Lockouts
Keep a spare key off-site. The most common lockout scenario is a key misplaced inside the house — a spare with a trusted neighbor or in a key lockbox near the front door eliminates this entirely.
Label spare keys clearly. A mailbox key on an unlabeled ring is indistinguishable from a dozen other keys. A simple label prevents the wrong key from being discarded.
Inspect the lock annually. A lock that's starting to stick or requires multiple attempts to open is about to fail completely. Replacing a stiff lock proactively costs the same as replacing a seized one — but avoids the lockout.
Consider upgrading to a keyless lock. Combination or digital mailbox locks eliminate the lost-key scenario entirely. A 4-5 digit code replaces the physical key — no key to lose, copy, or track. See our full guide on choosing a mailbox lock for keyless options and security considerations.
FAQ
Is it legal to open my own mailbox without a key? Yes — you can replace or have replaced the lock on a mailbox you own. What's illegal is damaging the mailbox or tampering with mail inside. For USPS-managed cluster box units, only USPS or your property manager can legally access the lock.
What is the fastest way to open a mailbox without a key? For a residential curbside mailbox, replacing the cam lock yourself is fastest — 5 minutes, no locksmith needed, costs $8-15. For a cluster box, calling your local post office is the only legitimate option.
Can USPS open my mailbox if I lost the key? For cluster box units they manage, yes — call your local branch directly. For individual residential mailboxes they don't manage the lock, but they can hold your mail while you arrange a replacement.
How much does a locksmith charge to open a mailbox? Typically $50-100 for a service call. Rekeying adds $15-30. For a standard lost-key situation on a residential cam lock, DIY replacement at $10-15 is faster and significantly cheaper.
How do I replace a mailbox lock myself? Unscrew the retaining nut inside the mailbox, remove the cam arm, pull out the old cylinder from the front, insert the new cylinder, reattach the retaining nut and cam arm. Under 5 minutes with a screwdriver. Measure your lock hole diameter (typically 5/8") before buying a replacement.
What is USPS Form 1094? The official form for requesting a duplicate PO Box key or lock replacement at a USPS Post Office Box. Submit in person at your local branch with photo ID. Key replacement costs $11.05, full lock replacement $21.10, processing 3-5 business days.
How can I prevent losing my mailbox key again? Keep a spare with a trusted neighbor or in a key lockbox. Label all spare keys clearly. Inspect the lock annually and replace it before it seizes. Consider upgrading to a keyless combination lock to eliminate the lost-key scenario entirely.