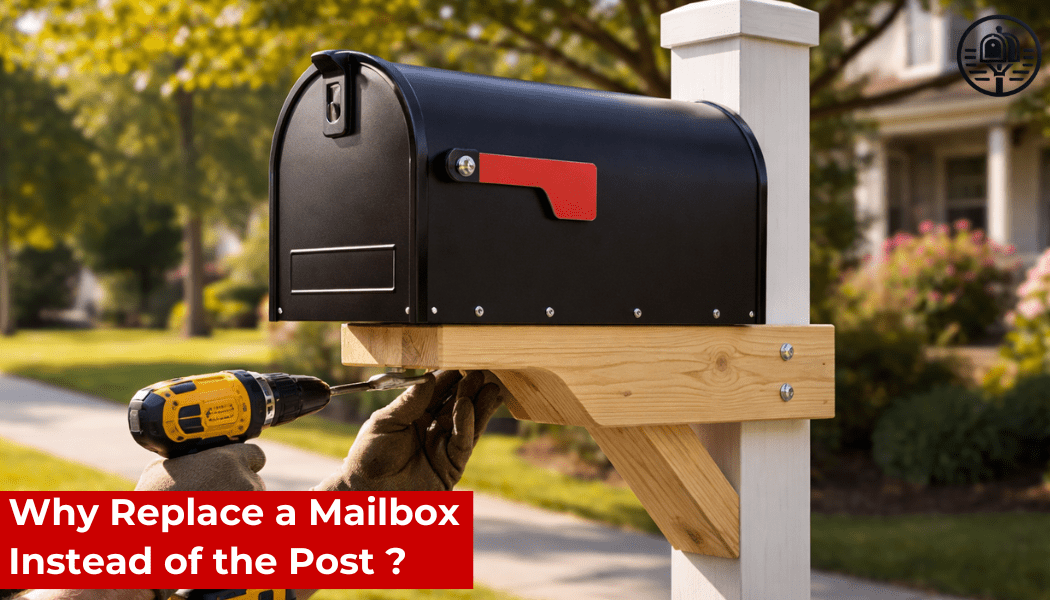
In many situations, the post itself is still solid and well-anchored. Learning how to replace a mailbox on an existing post allows you to save time, reduce costs, and avoid digging or concrete work. Common reasons for replacement include rust, dents, fading, broken doors, or upgrading to a locking mailbox for security.
As long as the post is stable, straight, and free of rot or cracks, replacing only the mailbox is a smart and efficient solution.
Tools and Materials You Will Need
Before starting, gather all necessary tools. Preparation is key when replacing a mailbox on an existing post.
You will typically need a screwdriver or drill, a wrench set, measuring tape, level, pencil, rust-resistant screws or bolts, and a mailbox mounting bracket if required. The new mailbox should be compatible with standard post dimensions, usually a 4x4 wooden post or a metal post.
Having all tools ready prevents delays and ensures proper alignment during installation.
Safety and Postal Regulations to Consider
Understanding safety and postal regulations is essential when learning how to replace a mailbox on an existing post. Mailboxes must be positioned at an approved height, generally between 41 and 45 inches from the road surface to the bottom of the mailbox. The distance from the curb should also meet local postal guidelines.
Always wear gloves to avoid sharp metal edges and use eye protection when drilling. If the mailbox is near traffic, work during low-traffic hours for added safety.
Step 1: Remove the Old Mailbox
Start by opening the mailbox door and locating the screws or bolts securing it to the post or mounting bracket. Using a screwdriver or drill, carefully remove all fasteners.
Once detached, lift the mailbox straight up and away from the post. Inspect the mounting surface for damage, loose hardware, or rust. This step is critical when replacing a mailbox on an existing post because a compromised base can shorten the lifespan of the new mailbox.
Step 2: Inspect and Prepare the Existing Post
Before installing the new mailbox, examine the post closely. It should be firm, vertical, and free from rot or corrosion. Use a level to confirm alignment. If the post is slightly uneven, minor adjustments may be possible by repositioning the mounting bracket.
Clean the top of the post and remove any old screws, nails, or debris. Proper preparation ensures that the replacement mailbox sits securely and evenly.
Step 3: Install a Mounting Bracket if Needed
Many modern mailboxes require a mounting bracket to attach properly to an existing post. If your new mailbox includes one, align the bracket according to the manufacturer’s instructions.
Measure carefully and mark drill points with a pencil. Drill pilot holes if necessary, then secure the bracket using rust-resistant hardware. This step is essential for anyone learning how to replace a mailbox on an existing post because improper mounting is the most common cause of mailbox instability.
Step 4: Attach the New Mailbox
Place the mailbox onto the bracket or directly onto the post, depending on the design. Align it so the door opens freely and faces the road squarely.
Secure the mailbox using the provided screws or bolts. Avoid overtightening, as this can damage the mailbox or strip the hardware. Use a level to confirm the mailbox is straight before fully tightening all fasteners.
Step 5: Final Alignment and Stability Check
Once installed, gently shake the mailbox to ensure it is firmly attached. Open and close the door several times to confirm smooth operation.
Check the height and setback once more to ensure compliance with postal standards. A properly installed mailbox should be stable, level, and accessible for mail carriers.
Common Mistakes to Avoid
When learning how to replace a mailbox on an existing post, several mistakes frequently occur. Skipping measurements can result in improper height. Reusing old, rusted hardware can compromise stability. Ignoring post damage may lead to future failure.
Avoid these issues by measuring carefully, using new hardware, and replacing the post entirely if it shows significant wear.
Cost and Time Estimates
Replacing a mailbox on an existing post is one of the most affordable exterior upgrades. A standard mailbox typically costs between $25 and $75, while decorative or locking models may cost more.
The entire process usually takes 30 to 60 minutes, making it an ideal weekend DIY project for homeowners with basic tools.
When to Replace the Entire Post
Sometimes, replacing only the mailbox is not enough. If the post is leaning, cracked, or unstable, installing a new mailbox on a damaged post is unsafe and ineffective.
In such cases, replacing the post ensures long-term durability and compliance. Knowing when not to reuse a post is just as important as knowing how to replace a mailbox on an existing post.
Conclusion
Learning how to replace a mailbox on an existing post is a practical skill that improves both functionality and curb appeal. With the right tools, careful measurements, and attention to safety, this task can be completed quickly and professionally. A properly installed mailbox not only looks better but also ensures reliable mail delivery for years to come.
FAQ: Replacing a Mailbox on an Existing Post
Can I replace a mailbox without removing the post?
Yes, as long as the post is stable and undamaged, replacing only the mailbox is safe and efficient.
Do all mailboxes fit standard posts?
Most mailboxes are designed for standard 4x4 posts, but always check compatibility before purchasing.
How high should a mailbox be installed?
The recommended height is typically 41 to 45 inches from the road surface to the bottom of the mailbox.
Is a mounting bracket always required?
Not always, but many modern mailboxes include a bracket for better stability and easier installation.
How long does it take to replace a mailbox?
In most cases, the process takes less than one hour using basic tools.